Pickled Radishes Garden and Gun Style

I didn’t make this recipe up it is from a gorgeous magazine called Garden and Gun in the US about good Southern Living. If you have some spare radishes and like a little spice, then I promise you, these are super tasty and will become an annual event.

Makes about 1½ quarts

Ingredients
2 bunches of radishes
1 cup plain white vinegar
½ cup sugar
2 tbsp. kosher salt
3 cups water
2 fresh Thai chiles, split lengthwise
4 garlic cloves
1 small piece of ginger, peeled and cut into thin rounds

Preparation
Wash and trim the radishes, leaving about half an inch 
of stem. Cut the radishes in 
half lengthwise and put them 
in a 2-quart jar with a lid. In a small nonreactive saucepan, combine the vinegar, sugar, and salt with water and bring to a boil. Cook for a minute to dissolve the sugar and salt completely. Remove from heat and let cool until warm. Add the chiles, garlic, and ginger to the jar and pour enough of the warm liquid over the radishes to completely cover them. Let cool, then cover and refrigerate for at least twenty-four hours and up to several weeks.

Variations: Green tomato wedges 
(add whole coriander seed, omit ginger); cauliflower florets (add turmeric, omit ginger); halved ripe semi-hot red chiles, such as Fresno.

“The Best Pizza outside Italy”

So easy and quick and delicious. Once you get in the swing of making them you’ll never have to have a frozen pizza in your freezer again. My pizzas inspired a friend of mine to get a pizza oven built in his garden. I’m not bragging I’m just so proud of that. In fact he said my pizzas were the best he’d had outside Italy. Glowing I tell you, glowing.

Ingredients

  • 900g white flour (or 600g white flour and some other flours if you want)
  • 100g cornmeal or semolina flour (or just flour of you don’t have those)
  • 1 level tablespoon salt
  • 2 tablespoons dried yeast
  • 1 tablespoon golden caster sugar
  • 650ml / just over a pint luke warm water
What to do now
  1. Mix all the dry ingredients together
  2. Add the water and mix into a ball
  3. Put the ball into a big oiled mixing bowl
  4. Flour the top and cover with a plastic bag for about half an hour or so  – it really doesn’t matter
  5. When you are ready to use it, divide into however many pizzas you want
  6. Roll them out 10 mins before you want to use them (you can make them thick and ‘deep pan’ or roll then thin for a more Italian experience
  7. Add toppings  – seriously whatever you like….tomato based, barbecue based, mozzarella, cooked meats, olives, potato and rosemary, add fresh herbs once cooked.
Cook in the hottest oven possible for about 10 minutes or until it looks like you want to eat it.

IMG_1703

Artisan Seedy Bread

This is our favourite bread at the moment. The seeds make it so tasty.

Ingredients

  • 6.5 cups of flour – at least 4 cups white and then you could mix in another type or two
  • 1.5 tablespoons instant yeast
  • 1.5 tablespoons salt
  • 3 cups luke warm water

What you do now

  • Mix all the dry ingredients together
  • Add the water and mix into a ball
  • Knead for about 6 minutes
  • Set aside in a big mixing bowl and pour a bunch of different seeds over it – I put sesame, pumpkin, sunflower, flak – anything you have really
  • Cover with a plastic bag and leave somewhere warm for a couple of hours
  • Knead again.
  • If you want to bake it then, make it into 2 loaves – a round ball if you like or a longer one, any shape you want.
  • Dust a metal baking tray / pizza stone with corn meal and place each loaf on.
  • Dust the top with flour and leave for about 15 minutes, they are then ready to bake
  • 425 degrees F for 30 minutesIMG_2915


Coffee Almond Ice-cream

This one is a new kid on the block and an immediate favourite.

What you need

  • 4 tablespoons butter
  • 1 cup roughly chopped almonds
  • 1 teaspoon good salt
  • 1 1/2 cups whole milk
  • 1 cup sugar
  • 4 tablespoons ground coffee
  • 3 cups heavy cream
  • 1 teaspoon vanilla extract

What to do now

  1. Melt the butter in a saucepan.
  2. When melted add the almonds, salt and stir
  3. Cook over a medium heat for about 5 minutes stirring occasionally
  4. Remove from the heat and strain. You can use the nut butter for something else.
  5. Leave the almonds to cool.
  6. Put the milk, ground coffee and sugar in a bowl and electric whisk it up for a couple of minutes
  7. Add the cream and vanilla
  8. Pour into the chilled ice-cream making bowl
  9. Put into the machine and turn on for 25 minutes
  10. Add the cooled almonds and mix for another 5 minutes
  11. Transfer into a glass-good-for-the-freezer-tub and store in the freezer.
  12. Eat a little at a time. It’s delicious.

Butter Pecan Ice-Cream

What you need….

  • 4 tablespoons butter
  • 1 cup pecan nuts chopped up
  • 1 teaspoon good salt
  • 2 1/4 cups whole milk
  • 2 1/4 cups heavy cream
  • Vanilla extract (not fake stuff, proper stuff) or even better a vanilla pod
  • 4 eggs
  • 2 egg yolks
  • 1 cup sugar

What to do now

  1. Melt the butter, once it’s melted add the nuts and stir.
  2. Cook on a lowish heat for about 5 minutes stirring occasionally until the nuts are browned.
  3. Remove from heat, strain, put nuts aside to cool. Use the nut butter for something else.
  4. If you are using eggs from a source you don’t know or if you are using a vanilla pod follow the next steps. I use eggs from our hens and use vanilla extract so I skip some steps and go straight to Number 7, then add the milk and cream to that mixture then go to number 12….
  5. Put milk and cream in a saucepan. If you are using a vanilla pod, scrape out all the seeds and add them and the pod.
  6. Bring the mixture to the beginning of a boil, then turn down to simmer for 30 minutes stirring occasionally.
  7. Combine the eggs, egg yolks and sugar in a bowl and whisk them ’til thick and creamy – probably a couple of minutes
  8. Take out the pod. That’s done with.
  9. Take roughly a cup of the liquid and add little by little to the egg mixture whisking as you add.
  10. Once this is mixed properly you can add it back to the milk/cream mixture and stir it in.
  11. Heat over a medium heat until it is thick enough to coat the back of a spoon.
  12. Add the vanilla extract if adding and pour into your chilled ice cream mixing bowl
  13. Turn the machine on and mix for 25 minutes
  14. Add the nuts and mix for another 5 minutes
  15. Once it is finished, scoop all the ice-cream out into a glass good-for-the-freezer-tub and put it in the freezer.


IMG_7490

The Best Ice Cream in the World

For some reason I thought that Ben and Jerry’s ice-cream wouldn’t have the extra rubbish that all the other food products in America have. I thought, made in Vermont, surely they won’t add corn syrup to all that yummy milk and cream they have up there…..I was wrong. You want to eat well and not puff up like a marshmallow over here, you gotta make it yourself. From scratch. End of Story.

So that’s what I did ….. with ice-cream too.

My lovely American relative, Betty (from my Scottish side) bought us an ice cream maker for our wedding. I love it.

So far we have 3 favourites:

  • Butter Pecan
  • Coffee
  • and my rebel one….Smores which is bum-smackingly naughty.

I make the best ice-cream in the world. It’s official. Following are the recipes for our favourites.


Steak and Mushroom Pie

I have only recently got into the swing of slow cookers. They’re pretty handy.

For this recipe use one of those, or a heavy based saucepan or a pot with a lid you can put in the oven on low.

pie top

Ingredients

A chunk of beef roast – it’s hard moving from country to country as everywhere has different names for cuts of meat. Basically you want a chunk of beef that is good for slow cooking. Cut it up into generous chunks.

An onion

4 cloves of garlic

4 carrots

A few bay leaves

Some thyme – fresh or dried

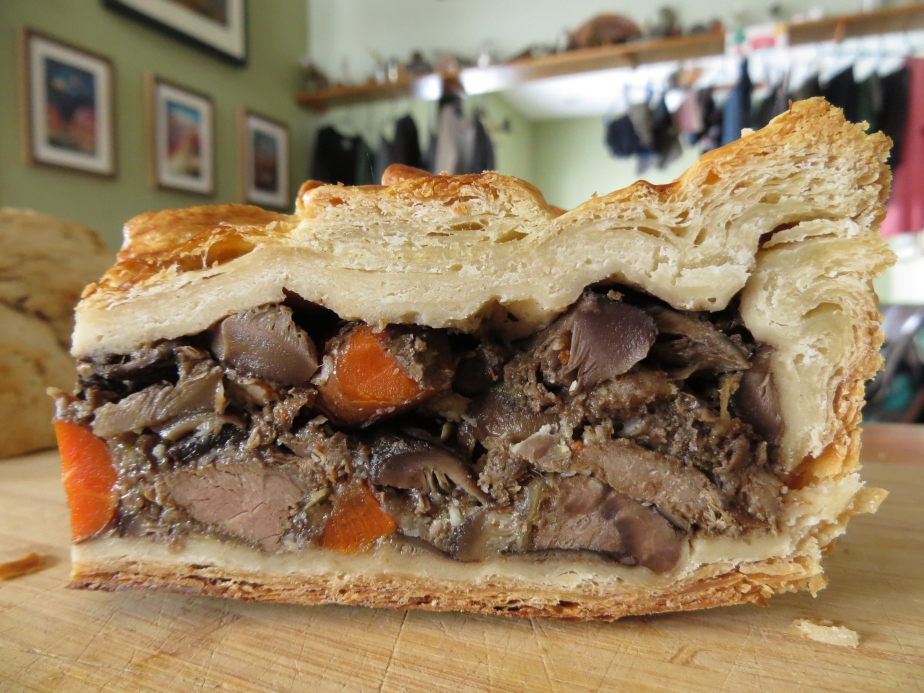
Some mushrooms (never ever bother with button mushrooms because they will add no flavour and they’re a waste of space and money) Pick a more robust one.

A glass or two of red wine

Some English mustard (or whatever mustard you may have)

About a third of a cup of flour well seasoned with salt and pepper

What to do 

  • Roll the chunks of beef in the flour
  • Heat some oil in a heavy based frying pan
  • Brown the meat in the oil
  • Once it is done put it into the saucepan/slow cooker whatever you’re using to slowly cook the dish
  • Once you have cooked the meat, put the red wine into the saucepan to deglaze i.e. get all the good sticky stuff out of the pan using a wooden spoon. Put that into the saucepan with the meat
  • Heat a little more oil and fry off the onions and garlic and carrots until a little softer (just a few minutes)
  • Add to the meat with the bay leaves, mustard and thyme
  • Add some stock (whatever you have – beef/vegetable) or water if you don’t have any stock – just enough to cover most of the meat. Not too much.
  • Simmer/put in the oven on 200 degrees/put the slow cooker on for about an 1.5 hours until the meat is fairly tender…it is going to continue cooking in the pie.
  • Check the flavour and add salt and pepper if necessary, then leave to cool
  • At this stage you can keep it in the fridge for a couple of days or indeed freeze it.
  • Or fry up the mushrooms for a few minutes and add to the beef

The Making of the Pie

  • See Ruff Puff Pastry recipe a couple below this recipe….(you will have made this earlier….)
  • Cut the pastry into 2 rectangles, one a little bit bigger than the other
  • Roll out the larger one to about 1/4 inch thick and use to line your slightly greased with butter pie dish. Trim off any excess.
  • Roll out the smaller piece so it will happily cover the pie
  • Spoon in the yummy filling (I’ll give you other recipes later – chicken and leek, rabbit with cider, mmm whatever you like really)
  • Add the juices to about 3/4 way up the meat.  Give the rest to your dogs if you have any. They will love you.
  • You could use egg yolk mixed with a little milk to seal the pastry together or you could crimp it together with your fingers
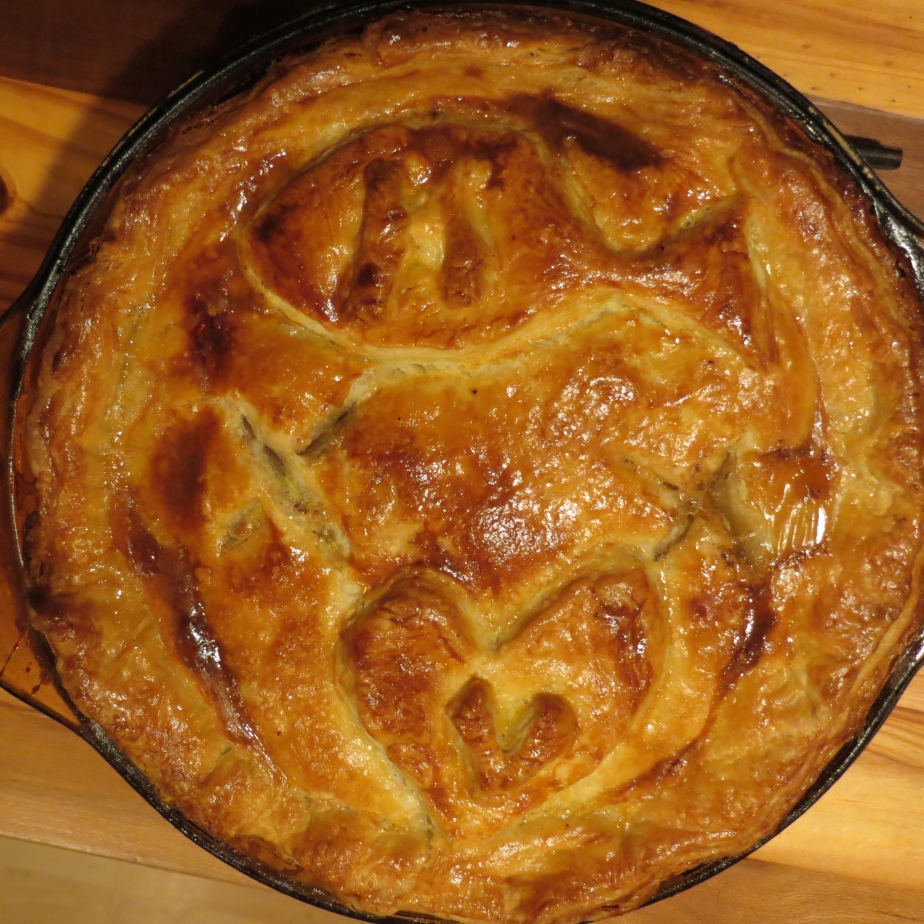
  • For funsies with any spare pastry you can make decorations for the top….see below! I made a fish for my darling because he is a little bit addicted to his beautiful fish aquarium/s right now.
  • Brush the rest of the egg yolk/milk mixture over the top and it will crisp up nicely like the photograph.
  • Make 2 crosses at each side of the pie with a big knife to allow steam out
  • Bake in a moderately hot oven (375 degrees) for 50 minutes – 1 hour until it looks golden brown.

Mmmmmmm you are in for one yummy treat. Serve with potatoes wedges, mashed potatoes, steamed greens, whatever you like.

And of course you can use the filling to make hand held pasties as well, which is the same pastry just shaped differently. A circle with the filling out on one side and then folded over and crimped closed. These freeze well and then you just take them out and cook them from frozen. Easy peasy.

pie top

Just a quickie…..

This milkshake will rock your world, I promise, you don’t even need to like bananas much as I don’t but this is delicious.

Throw the following in a blender

  • Banana – frozen if possible (did you know that if your bananas are about to go off and you don’t fancy eating them, put them in the freezer. They will last and are perfect for this milkshake if nothing else.
  • Peanut butter
  • Honey
  • Milk

I don’t have specific amounts, just put say 1 banana, one heaped tablespoon peanut butter, 1 teaspoon honey, half a pint of milk …

Blend, pour into a glass. Love me forever!


Ruff Puff Pastry

This is a recipe I’ve taken from Hugh Fearnley-Whittingstall who I think is magic. It can be used for savory pies, Cornish pasties, old school vol-a-vents…..

Main tips are to have the butter super cold, don’t handle the pastry much and let it rest once you’ve made it.

Ingredients 

3/4 cup plus 2 tablespoons cold butter cut into little cubes

3 cups unbleached all purpose flour

A big pinch of salt

Iced water

1 egg yolk (always always free range) with a splash of milk to glaze

What to do

  1. Put the little cubes/chunks of cold butter into the flour and salt and coat them all. This feels really nice on your hands.
  2. Add a little iced water and keep adding ’til all the flour is wet enough to make into a ball. It is probably about half a pint, but just add little scooshes at a time. Don’t make it too sticky.
  3. Flour your surface and shape the dough with your hands to a fat rectangle. Don’t handle it much as you want to keep the block cold.
  4. Roll it out with a rolling pin (glass bottle if you don’t have one) keeping the rectangular shape
  5. When the dough is about 3/4 inch fold the far third towards you and the near third back over that so you have a rectangle a third of the size and 3 times as thick.
  6. Turn the rectangle 90 degrees and then roll back out making another long rectangle
  7. When it is about 3/4 inch think again fold the far third towards you and the near third back over that like you did before
  8. Repeat about 5 or 6 times dusting with flour when you need to.
  9. If it becomes at all sticky (due to a warm room) pop it in the fridge for a while, dust with flour and try again.
  10. When you’ve finished put it in the fridge for at least an hour

Pie fillings to follow later, got to go chainsawing now with my honey.

pie


Beer Bread

IMG_0505

I hereby promise to give you good food, not rabbit food. So I’ll start off with beer bread. It is delicious and once you get in the swing of it, easy peasy.

Buy quality ingredients and forget low fat, 2% fat, reduced fat bullshit. Full fat will fill you up, it will reduce your hunger so you won’t keep eating. Just eat in moderation. If you want to buy no fat products this is not the site for you. I am a full fat chick. Taste not quantity.

Ingredients for one loaf

3 cups of unbleached flour

1/4 teaspoon instant yeast

1 1/2 teaspoon salt

3/4 cup + 2 tablespoons room temperature water

1/4 cup + 2 tablespoons lager

1 tablespoons white vinegar

What to do

  1. Put flour, salt and yeast in a bowl and mix
  2. Add liquids and mix together (I use my hands) to make a shaggy ball
  3. Place in a big bowl, sprinkle with a little flour and cover with a tea towel
  4. Leave somewhere warm for 8-18 hours
  5. Get a dutch oven / heavy bottomed saucepan without a handle you can put in the oven….smear a little butter or oil all over the inside, then sprinkle flour in and shake it all around so it is coated
  6. Knead dough – stretch it, fold, stretch it, fold, stretch fold till it is springy and not sticky. Use your body, part of staying active and feels wholesome and sexy all at once (ok maybe that’s just me)
  7. Make dough a ball and pop into the dutch oven. Sprinkle with flour and cover with a tea towel
  8. Leave for about 2 hours somewhere warm
  9. Sprinkle top with flour and slash with a knife about 1/2 inch deep – a cross, 3 parallel whatever you like
  10. Put the lid on the dutch oven and place in the oven on the lowest rack.
  11. Turn oven on to 425 degrees F / 219 degrees C and bake for 45 minutes
  12. Remove lid and bake for a further 20 – 30 minutes until brown
  13. Take out of the oven and cool on a wire rack or balance on 2 wooden spoons, 2 upturned mugs, whatever is handy….
  14. Let cool as long as you can manage and then spread butter. Throw away any crappy margarine you may have and put butter on. Yes THAT is an order.
  15. Attempt not to eat all at once.